Print expert and FN-INK™ Puff enthusiast Colin Huggins went live on Friday to answer frequently asked questions about this rad 3D ink. If you missed the live stream, don’t worry: we’ve got your back. Huggins covered best practices, getting tons of detail, proper curing, and more. Check out the highlights.
THE BASICS OF PRINTING PUFF INK
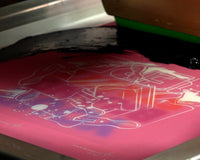
No demo would be proper without first talking about the basics. Huggins printed a Maori turtle design in teal. The best way to get a lot of puff in an ink is to either lay down a thicker ink deposit or increase the percentage of puff in the ink (up to 20%).
In between technical issue breaks — ah, the beauty of live streaming — Huggins demonstrated how FN-INK™ Puff gets that loft. When Puff is cured properly, it will expand and cause the shirt to pucker. This creates an embossing effect on the inside of the shirt. The wider the area of puff printed, the more the shirt will pucker. Thin areas of the design won’t pucker the shirt as much and therefore won’t have the same loft as a thick area of puff.
Huggins prints the Maori turtle on a 110 mesh screen with a 60 durometer squeegee. Using lower mesh counts will automatically give a thicker ink deposit and will create a bigger puff effect in the ink. To get a larger puff response in the print, printing a thicker deposit of ink is most important. It’ll make the print more durable in the long term.
Flood the stencil before printing. Pre-filling a thicker stencil with ink will go a long way to creating a thicker, smoother ink deposit when you print. Huggins uses a 45° angle when printing to lay ink on top of the fabric rather than pushing ink into the shirt.
RELATED: TAKE YOUR PRINTS TO THE THIRD DIMENSION WITH FN-INK™ PUFF
PRINTING DETAIL WITH PUFF
If you can hold detail on a screen, you can print it with FN-INK™ Puff. Remember Huggins’s earlier conversation about shirt puckering? Puff ink will print tons of detail, but a large amount of loft will only happen if the print can pucker the shirt.
Huggins prints a Maori manta ray design that’s covered in small geometric lines. Most of this design contains fine detail that won’t cause the shirt to pucker once it’s cured.
ADJUSTING ART
Puff ink doesn’t just puff up: it puffs out, too. If the art you’re using has a lot of fine detail that’s close together, puff can close up that detail. Huggins adjusted the line weight thickness of the Maori manta ray design. He made the lines thinner so the details wouldn’t puff out.
You don’t always need to adjust your art, though. Sometimes, adding a smaller percentage of puff additive to the ink will do the trick. The manta ray design is printed with 10% puff by weight instead of the full 20%, so as not to close up detail.
back to top ^
PRINTING MULTICOLOR PUFF
There are two ways to print a multicolor design with FN-INK™ Puff. You can either mix puff into every color or print puff as an underbase.
When adding puff to every color, you’ll need to be careful with flashing. Gently flash each color after you print, making sure that the puff hasn’t activated. This can get tricky, especially if you’re looking for lots of loft in your design.
Adding puff to the underbase of your design is the easiest way to create a multicolor puff print. Huggins references an owl design, which was printed with a puff underbase two ways: one with a partial puff base under a white base, and one with a partial puff base overtop the white base. Both prints had colors without puff printed on top of the base. When printing that design, Huggins was careful to keep his platens warm to ensure the best print.
The puff base underneath the white base showed more shirt texture in the final print. Printing puff over an underbase will give a smoother final print but will have less loft because the puff can’t pucker the shirt as much.
DOES PRINTING PUFF OVER AN UNDERBASE CREATE MORE DETAIL?
Printing puff over a solid sheet of ink like a base, and the shirt won’t pucker as much. While this won’t actually create more detail, the detail will show up more obviously because the shirt isn’t flexing as much with the puff ink. To get more detail, lower the percentage of FN-INK™ Puff in the ink. Use 10% by weight instead of 20% to create more detail.
PRINTING PUFF WITH METALLIC INKS
FN-INK™ Puff can be mixed into any ink, but the final effect of a metallic ink mixed with puff might not be what you’re looking for. When puff is mixed into an ink, it creates a milky effect. Inks with a metallic flake, like FN-INK ™ Gold, need light to reflect the flake and make it shine. When puff is mixed in metallic ink, the milky effect stops light from reflecting off the metallic flake. The only metallic shimmer you’ll get is from whatever flake is on the outside of the puff mix when it puffs. This can be interesting, but might not be the effect you wanted.
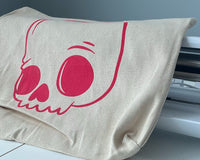
To print puff with metallic inks, it’s best to print the metallic overtop FN-INK™ Puff. Huggins references a gold skull design. The design has puff mixed into a cream color with FN-INK™ Gold printed on top of it. This allows the gold to shimmer without being lost in the puff mix.
RELATED: MISSED THE LIVE FN-INK™ SPECIALTIES Q&A? HERE ARE THE HIGHLIGHTS
back to top ^
FLASHING PUFF
When flashing FN-INK™ Puff, it’s important to give the ink enough time to gel, but not too much time to activate. Once Puff activates, it will not only throw off registration and cause some issues in printing other colors but will deflate in the dryer when it’s time to cure the entire print.
WHAT HAPPENS WHEN YOU OVER-FLASH?
FN-INK™ Puff activates at 260°F. It’s stable up to temperatures of 280°-290°F. When puff ink is flashed for too long, it will collapse, and the puff effect won’t be as impressive. A great indicator of over-flashing is that the ink in the over-flashed spot will be shiny.
CURING PUFF
You can cure FN-INK™ Puff inks in a few different ways, but the best way is through a conveyor dryer. It’s not recommended to cure puff ink with a flash dryer, since the heat from a flash unit is not consistent. There’s a sweet spot in every flash unit—usually in the center—where the ink will cure more quickly than the rest of the print. When curing FN-INK™ Puff with a flash unit, the ink in that sweet spot will cure quicker and will deflate or collapse by the time the edges of the design are cured.
Conveyor dryers are much more consistent, though there can be a slight heat discrepancy from one side of the conveyor to the other. Because the heat is in a confined space, it’s much easier to get a consistent cure. Speed and temperature can also be controlled better with a conveyor dryer.
A heat press is another way many screen printers cure garments. When curing puff with a heat press, use the lightest pressure possible. Since FN-INK™ Puff needs to rise in order to create a puff effect, pressing a heat press onto it won’t cause it to expand. If possible, hover the heat press over the puff print, creating as close a space as possible.
RELATED: ENSURING PROPER INK CURING
back to top ^
WHAT SUBSTRATES CAN YOU PRINT WITH PUFF?
Screen printing isn’t restricted to T-shirts. FN-INK™ Puff can print on many other garments and substrates. Print on any fabric you’d like with puff. Cotton fabrics hold moisture and heat up slower, whereas a tri-blend or polyester shirt will heat up much quicker. Adjust cure temps and times to reflect the garments you’re printing on.
When screen printing puff on fabrics like Dri-Fit, Colin recommends printing an underbase first. Dri-Fits tend to be fuzzier garments, so an underbase will create a smooth puff effect. Otherwise, you can print puff and smooth it down with a smoothing screen, Stampinator, or iron. However, be careful when smoothing this down. Since puff is a sensitive additive, make sure not to get the ink too hot while smoothing it down.
FN-INK™ Puff can print on other things besides garments. Since it’s a heat-reactive additive, it will puff on any substrate you’d like to print on. Take koozies, for example. Since koozies aren’t easy to print on, printing puff with a heavier ink deposit with a low mesh count creates great effects. Mixing puff into a low-bleed or poly white will also eliminate dye migration or bleed, so you can print white ink on a red koozie.
SHOULD YOU CHARGE MORE FOR PUFF PRINTS?
Short answer: yes. Whenever you’re printing with a specialty ink, you should be charging customers a little bit more than a standard spot color or halftone design. Whether that design is printed with metallic ink, stretch ink, puff ink, or any other specialty ink, you’re usually paying a bit more for each bucket of ink than you would a standard ink. You’re also making special screens and paying special attention to the print process to make sure everything goes to plan.
All these extra costs — ink, labor, time, etc. — add up. Make sure to charge what the print (and your time) is worth. If you’re doing anything special to a design, like adding FN-INK™ Puff, your price should reflect it.
RELATED: A GUIDE TO PRICING SCREEN PRINTED GARMENTS AND TURNING A PROFIT
back to top ^
PROPER CARE OF PUFF PRINTS
Taking care of your printed shirts is important. As a printer, it’s important to ensure proper cure before sending the shirts to the customer. Make sure the print is cured just right. Adjust dryer settings and temps to make sure that your ink is cured properly.
Puff prints should last just as long as regular plastisol prints. Make sure to take good care of them, though. Wash the shirt inside out, hang it up to dry, and use gentle heat settings when laundering your shirts.
Printing with FN-INK™ Puff can create some awesome 3D effects. It’s all about what you and your customer like. Experiment with different printing methods and mixing ratios to find the puff print that speaks to you.
Want to catch the next live stream? Subscribe to our YouTube channel and follow us on Instagram for updates and more awesome content.


